How To Properly Mount Your Rooftop Camping Tent
Off-roading is an adventure, but you can prioritize comfort during your exciting trek, too. Rooftop tents turn trucks into comfortable sleeping spaces during off-road trips. After all, elevating your tent is more comfortable than lying down on the bumpy ground every single night. If you want the best experience with your rooftop tent, you need to install it correctly.
Don’t worry; this installation is fairly easy, and our guide here will help you along the way. You should always consult the user manual for your specific tent, but this guide will highlight other essential details before the installation. Read this complete guide to learn how to properly mount your rooftop camping tent.
Gathering Your Materials
Not all rooftop camping tents are identical, so the installation experience may vary slightly between models. At Ironman 4x4, we have various rooftop tents for sale, including the Nomad 2.0 and more. Mounting your rooftop tent requires working with small components that are easy to lose track of, so gather them into one place and consult your user’s manual. It’s also important to double-check the parts you have to ensure the manufacturer properly packed everything.
Luckily, these parts won’t run away from you, so find a stable place to put them down. Once you find a safe spot, you can leave the parts alone until you need them. Mounting the Nomad 2.0 rooftop tent requires parts such as mounting bolts, side plates, mounting rail end caps, mounting plates, awning strays, and a ladder. If you have everything you need, then you’re ready to proceed.
Mounting the Hardware
The right tent will be straightforward to install. That said, you should have a partner by your side to help you secure the equipment in place. A secure installation comes down to properly placing the tent on the mounting points and securing the aforementioned parts together.
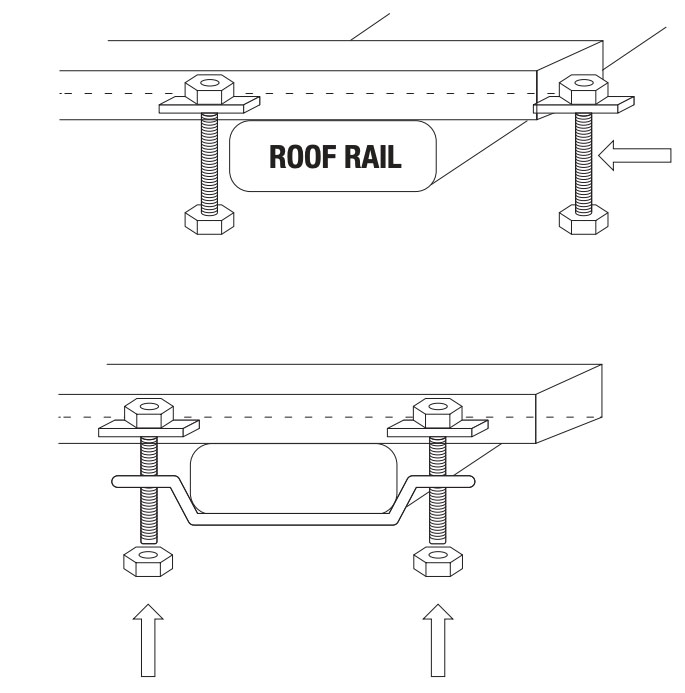
For example, the Nomad 2.0 first requires you to place the tent on the roof rails. Then, you place the bolts in the side plates before inserting them into the mounting channel. Don’t fasten everything too tightly yet, so you can adjust the positions of parts when necessary. Once the bolts are in place, pick up your mounting plates.

Carefully insert the Nomad 2.0 mounting plates at the bottom of the bolts. You will then secure the mounting plate to the bolts using your Nylock nuts. Now, you can focus on tightening everything together. No parts of the tent should be wobbly or loose when it’s open.
Double-check to ensure everything is currently in the right position, then secure it all together so it is tight and ready for the off-road travel ahead. Before embarking, there is still one more step to cover. After securing all your mounting parts in place, place the plastic end caps on the mounting channel.
Completing Your Setup
Before showing up at your campsite, practice setting up your tent, so you know how to open and close it successfully. Opening a tent may sound simple, but there are still a few more parts to install. Once the previous steps are complete, your tent should be stable and ready to open. With the Nomad 2.0 rooftop tent, this is the point when you would release the straps that hold the lid closed.
These lid-securing straps are strong enough to keep your parts intact, but easy enough to open when you want to get your tent ready to rest in. After releasing the straps, open the Nomad 2.0 lid completely. When the lid is finally securely open, extend the tent ladder outward. This will be your access point to your rooftop tent at all times. Rotate the floor section so you can get it into a horizontal position.
Finishing Touches
Now, the ladder should feel safe to climb on. For the best experience with a Nomad 2.0, make sure your ladder is standing at a 60-degree angle. Consider any additional features about the tent that you need to prepare. For example, the Nomad 2.0 at Ironman 4x4 is a rooftop tent that features a convenient window.
Once you extend the ladder on this tent, you can get the window ready. Pick up the awning strays and identify the front and side window awnings. Next, look for the mounting holes at the base of the window awnings. Place the strays inside the mounting holes and securely move them through the eyelets in the fabric. Once this is done, your tent is open and ready for business.
Set Up on Stable Ground
Now that you know how to properly mount your rooftop camping tent, you’re almost ready to embark on your next off-road trek. First, there are a few things you should know post-installation. More specifically, these tips will help when you arrive at your campsite.
The best experience with any rooftop tent always takes place on stable ground. Upgrading your truck’s suspension and other parts makes the vehicle better at driving over uneven surfaces. Parking on an uneven surface to set up your tent isn’t advisable because it creates an uncomfortable sleeping experience.
You shouldn’t be sliding around in your tent when you’re trying to sleep or relax. Take time to ensure that your vehicle is on flat terrain when you set up the tent. Of course, finding level ground isn’t always easy when you’re overlanding. Bring chocks for your tires so you always have a backup. Chock the tires to keep them sturdy and level so you can enjoy a restful sleep.
Establish Enough Space
You must also measure how much space you have around the vehicle before opening the rooftop tent. For instance, the Nomad 2.0 comes with a convenient ladder for getting into and out of the tent. This ladder is a comfortable access point, but that comfort will be short-lived if there isn’t enough space on the campsite for the ladder. Plus, make sure you have room for getting on and off the ladder easily.
These are seemingly small details, but they will have a big impact on your experience during your whole trip. Now that you have this comprehensive guide, double-check your user’s manual so you know the finer details of your specific equipment. Then, you can use your new knowledge to install your rooftop tent with rewarding results. Use this guide to start setting up your tent now if you’re ready for your next off-road camping trip.


